Although I am not a bead weaver as such this is a nice turtorial provided by Beading Daily, you can subscribe to their free newsletter with this link,
http://www.beadingdaily.com/user/CreateUser.aspx?ReturnUrl=%2fdefault.aspx
This technique could be done with a 28-30 gauge dead soft wire instead of the beading string. Enjoy! D.
The trickiest part of circular brick stitch is fitting the right number of beads in a flat circle for each concentric round. Don't try to squeeze in too many beads, or the shape may buckle into a ruffle (which is nice only if you want it that way). For a flat circle, spread out your stitches neatly and evenly around the circle
1: Pass through the central bead twice, placing the two thread loops on either side of the bead. The brick-stitched beadwork will attach to these base threads. You want them strong.
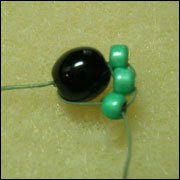
2: Always start a row of brick stitch with 2 beads. String beads 1 and 2. Pass under the thread loop and up through the second bead strung. Pull the thread and nudge the beads with your fingers to lie snug to the center bead
3: String bead 3, pass under the thread loop and pass back up through bead 3. Again, nudge the new bead in place and keep your thread tension snug.

4: Repeat around your center bead, spacing the beads to fit evenly. In this lesson, 8 green beads fit nicely around the center round black bead; string bead 8, pass under the thread loop and back up through bead 8. Pass down into bead 1, under the thread loop, and exit out bead 1 again, ready to start a new row. Continue, starting each new row with 2 beads.


I'm just starting out with bead weaving and this is great to know. Makes it so much easier. Thanks
ReplyDeleteThanks so much! I've been saving all these patterns but did not know how to actually "start". Now I do.
ReplyDelete